No Knead Artisan Bread
No Knead Artisan Bread is a magical experience for anyone who has ever dared to dream of creating bakery-worthy bread at home. This easy-to-make recipe yields a beautifully crusty exterior and a soft, airy interior that is simply irresistible. The aroma of freshly baked bread wafting through your kitchen is like a warm hug, inviting all to gather around the table. If you’ve been searching for a straightforward, step-by-step bread recipe that requires minimal effort and delivers maximum satisfaction, you’ve just found it!
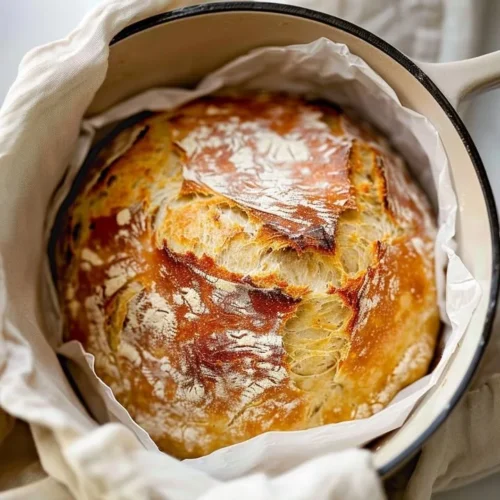
Imagine slicing into a loaf with a crackling crust, steam escaping as you reveal the soft, fluffy center. It’s perfect for everything from breakfast toast to weekend sandwiches. Trust me, once you try this recipe, you’ll wonder why you ever hesitated to make your own bread.
Why You’ll Love This Recipe
This No Knead Artisan Bread is perfect for everyone—whether you’re a beginner in the kitchen or an experienced baker seeking a no-fuss option. The beauty of this recipe lies in its simple preparation and minimal ingredients, making it not only easy but also extremely rewarding.
With just a few pantry staples, you’ll be able to create a crusty, artisan-style loaf that’s family-friendly and versatile. Ready in about three hours, it fits seamlessly into your day, allowing you to enjoy freshly baked bread without spending hours in the kitchen.
Ingredients for No Knead Artisan Bread
- 3 cups bread flour (450g): This special flour gives the bread its chewy texture and structure.
- 1 tablespoon white granulated sugar: A hint of sweetness to balance the savory flavor.
- 2 teaspoons dried, instant or rapid-rise yeast: The magic ingredient that helps the dough rise beautifully.
- 1 1/2 teaspoons salt: Essential for flavor and controlling fermentation.
- 1 1/2 cups warm water (375 ml): Activates the yeast and hydrates the flour for a perfect dough.
- 1 tablespoon olive oil: Adds richness and flavor to the bread.
Step-by-Step Directions
Begin by combining the bread flour, sugar, yeast, and salt in a large mixing bowl. Use a whisk to ensure everything is evenly combined, creating a dry base for your dough.
Make a well in the center of the dry ingredients and pour in the warm water and olive oil. Using a wooden spoon or spatula, mix until all the ingredients are incorporated. You’ll notice the dough will be wet, sticky, and shaggy—this is normal!
Lightly spray the surface of the dough with cooking oil spray. Cover the bowl tightly with plastic wrap and then place a dry tea towel over the top. Set the bowl aside in a warm, draft-free area for 2-3 hours, until the dough has doubled in size.
While the dough rises, place a large Dutch oven or a heavy-based pot (with a lid) in the oven and preheat it to 450°F (230°C) about 30 minutes before baking.
Once the dough has risen, lightly flour your work surface. With a spatula, scrape the dough out of the bowl, being careful not to deflate it too much. Fold it over itself gently to form a round shape.
Transfer the dough onto a piece of parchment paper and allow it to rest for about 30 minutes. This will help it retain its shape.
Carefully remove the hot pot from the oven and lift the parchment paper with the dough into the pot. Cover the pot with the lid and bake for 30 minutes.
After 30 minutes, remove the lid and bake for an additional 12-15 minutes, allowing the crust to brown beautifully.
Once done, carefully remove the bread from the pot and let it cool on a wire rack for at least 10 minutes before slicing.
Tips & Tricks
- Hydration is Key: Don’t skimp on the water! The wet dough is essential for achieving that lovely crumb and airy texture.
- Flavor Boost: Experiment with adding herbs, garlic, or cheese to the dough for additional flavors.
- Patience is a Virtue: Bread develops better flavor when you allow it to rest and rise fully, so if you can, let the dough rise longer than the suggested time.
- Use a Kitchen Scale: For the most accurate measurements and better results, consider weighing your ingredients.
- Don’t Rush the Cooling: Allow the bread to cool completely before slicing to prevent gummy slices.
Serving Suggestions & Pairings
This No Knead Artisan Bread is not only a standalone treat but pairs wonderfully with a variety of dishes. Serve it warm with a smear of butter or a drizzle of olive oil for a simple yet satisfying experience. It also makes a perfect accompaniment to soups, stews, and salads. For a special brunch, slice it thinly and toast it for delicious avocado toast topped with poached eggs.
Get creative by making sandwiches or paninis, filling them with your favorite ingredients. The bread also works well for crostini—just slice, toast, and top with fresh tomatoes, basil, or even tapenade for an elegant appetizer.
Nutritional Information
This bread is not only delicious but can also be a part of a balanced diet. Each slice offers a satisfying bite while remaining relatively low in calories compared to store-bought options. While the total calorie count may vary based on the size of the loaf and thickness of slices, a rough estimate is about 80-100 calories per slice. It’s a wholesome addition to your meals that encourages sharing and enjoyment around the table.
Storing Tips & Variations for No Knead Artisan Bread
To keep your No Knead Artisan Bread fresh, store it in a paper bag at room temperature for up to 3 days. Avoid plastic, as it can create moisture, leading to a soggy loaf. If you want to store it for longer, consider slicing it and freezing the pieces in an airtight container. Simply toast or warm them in the oven when you’re ready to enjoy again.
If you’re seeking healthier swaps, consider using whole wheat flour instead of bread flour or adding seeds like flaxseed or chia for added nutrition and texture. Get adventurous and create flavor variations by incorporating spices or different types of flour to suit your taste.
Conclusion for No Knead Artisan Bread
Now that you have the perfect recipe for No Knead Artisan Bread, it’s time to roll up your sleeves and enjoy the wonderful world of homemade bread. With minimal ingredients and simple steps, you’re just a few hours away from a delightful bakery-style loaf that will impress family and friends alike. So don’t wait—jump into your kitchen and experience the satisfaction of creating your own artisan bread today!
FAQs
Can I use all-purpose flour instead of bread flour?
Yes, you can use all-purpose flour, but the texture might not be as chewy. Bread flour has a higher protein content, which helps with the structure of the bread.Is it necessary to use a Dutch oven to bake the bread?
While a Dutch oven helps create steam, which gives the bread its crust, you can bake it on a baking stone or in a regular oven but may need to adjust the cooking time.What if my dough doesn’t rise?
Ensure your yeast is fresh and that you’re using warm water around 100°F (38°C) to activate it. If it still doesn’t rise, the dough may need more time in a warm place.Can I add ingredients like cheese or herbs?
Absolutely! Feel free to fold in grated cheese, minced garlic, or herbs after mixing the initial dough for added flavors.How can I tell when my bread is done baking?
The bread should have a beautiful golden-brown crust and sound hollow when tapped on the bottom. Additionally, an instant-read thermometer should read about 200°F (93°C) in the center for a perfect bake.
No Knead Artisan Bread
Ingredients
Main Ingredients
- 3 cups bread flour This special flour gives the bread its chewy texture and structure.
- 1 tablespoon white granulated sugar A hint of sweetness to balance the savory flavor.
- 2 teaspoons dried, instant or rapid-rise yeast The magic ingredient that helps the dough rise beautifully.
- 1.5 teaspoons salt Essential for flavor and controlling fermentation.
- 1.5 cups warm water Activates the yeast and hydrates the flour for a perfect dough.
- 1 tablespoon olive oil Adds richness and flavor to the bread.
Instructions
Preparation
- Combine the bread flour, sugar, yeast, and salt in a large mixing bowl. Whisk together to ensure everything is evenly combined.
- Make a well in the center of the dry ingredients and pour in the warm water and olive oil. Mix with a wooden spoon or spatula until all the ingredients are incorporated. The dough should be wet, sticky, and shaggy.
- Lightly spray the surface of the dough with cooking oil spray. Cover the bowl tightly with plastic wrap and place a dry tea towel over the top. Set it aside in a warm, draft-free area for 2-3 hours until the dough has doubled in size.
Baking
- While the dough rises, preheat a large Dutch oven or a heavy-based pot (with a lid) in the oven at 450°F (230°C) for about 30 minutes before baking.
- Once the dough has risen, lightly flour your work surface. Carefully scrape the dough out of the bowl, folding it over gently to form a round shape.
- Transfer the dough onto parchment paper and let it rest for about 30 minutes.
- Remove the hot pot from the oven and lift the parchment paper with the dough into the pot. Cover with the lid and bake for 30 minutes.
- After 30 minutes, remove the lid and bake for an additional 12-15 minutes, allowing the crust to brown beautifully.
- Remove the bread from the pot and let it cool on a wire rack for at least 10 minutes before slicing.