Gingerbread Cookies with Winter Forest Design are the epitome of festive baking. With their rich aroma of spices and sweet molasses, these cookies evoke warm memories of family gatherings and cozy winter nights. The delightful crunch on the outside and soft chewiness on the inside makes them irresistible, perfect for sharing with loved ones or displaying on your holiday table. This step-by-step recipe is accessible for bakers of all levels, ensuring that you can create beautiful treats that are as wonderful to look at as they are to eat. Let’s dive into why you’ll love making these Gingerbread Cookies with Winter Forest Design!
Why You’ll Love This Recipe
There’s so much to adore about this Gingerbread Cookies with Winter Forest Design recipe! First, it requires minimal ingredients, yet the flavors are incredibly rich. The prep time is quick, making these cookies an excellent choice for last-minute baking sessions or family activities. Not only are they delicious, but they also serve as a canvas for your creativity! You can get whimsical with the royal icing decorations, making them a fun project for kids and adults alike. They are undeniably crowd-pleasers—perfect for parties, gift-giving, or just enjoying at home.
Ingredients
To make these delightful cookies, you will need:
- 3 1⁄4 cups (400g) all-purpose flour, perfect for creating a sturdy yet tender base.
- 3⁄4 teaspoon baking soda, which helps them rise perfectly in the oven.
- 1 tablespoon ground ginger, adding a warm, spicy kick that is quintessential for gingerbread.
- 1 tablespoon ground cinnamon, filling the kitchen with comforting scents.
- 1⁄4 teaspoon ground cloves and 1⁄4 teaspoon nutmeg, combining for an aromatic profile that feels like a warm hug.
- 1/2 teaspoon salt, balancing the sweet flavors beautifully.
- 1/2 cup (115g) unsalted butter, softened, ensuring rich flavor and silky texture.
- 1/2 cup (100g) packed brown sugar, providing moisture and that deep molasses flavor.
- 1 large egg, which acts as a binding agent.
- 2/3 cup (160ml) unsulfured molasses, the star ingredient that lends sweetness and depth.
- 1 teaspoon pure vanilla extract, enhancing all the flavors harmoniously.
- 3 cups (360g) powdered sugar for the royal icing, adding sweetness and shine.
- 2 large egg whites or 3 tablespoons meringue powder mixed with 6 tablespoons water, essential for creating the perfect royal icing.
- 1/2 teaspoon vanilla or almond extract for flavoring the icing.
- Gel food coloring (green, white, brown, and optional blue) to create stunning winter forest designs.
- Edible gold dust for a magical touch on your deer designs.
- Fine sugar or edible glitter to sprinkle for the snow effect.
- Piping bags and small piping tips to flawlessly decorate your cookies.
Step-by-Step Directions
In a medium bowl, whisk together the flour, baking soda, ground ginger, cinnamon, cloves, nutmeg, and salt. This mix of spices is the heart and soul of your gingerbread cookies, offering an aromatic experience before you even start baking.
In a large bowl, cream the softened butter and brown sugar until light and fluffy. This will create a light texture that keeps your cookies tender. Add the egg, molasses, and vanilla extract, mixing until fully combined.
Gradually add the dry ingredients to the wet mixture, stirring until a dough forms. If your dough is too sticky, don’t hesitate to add a bit more flour to achieve the right consistency.
Once the dough is well mixed, divide it into two portions, wrap each in plastic wrap, and chill in the refrigerator for at least one hour. Chilling is crucial—it helps the cookies maintain their shape while baking.
Preheat your oven to 350°F (175°C) and line baking sheets with parchment paper. This ensures easy clean-up and helps prevent sticking.
On a floured surface, roll out one portion of your dough to about 1/4-inch thickness. Time to get creative! Use cookie cutters to cut out your desired shapes.
Place the dough cutouts on the lined baking sheets, leaving space between them. Bake in the oven for 8-10 minutes or until the edges are lightly golden.
Allow the cookies to cool on the baking sheets for a few minutes before transferring them to a wire rack, where they will cool completely.
To prepare the royal icing, beat the egg whites (or meringue mixture) until stiff peaks form. Gradually add in the powdered sugar and vanilla extract, mixing until smooth. This is going to be your key to stunning decorations!
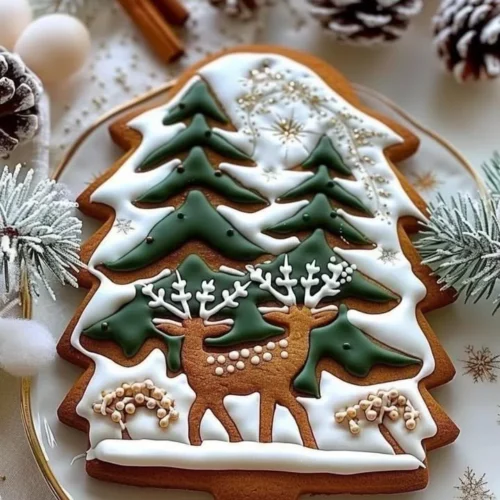
Divide your icing into bowls and color each with food coloring according to your winter forest design. Let’s get imaginative—use green for trees, brown for deer, and white for snow!
With your piping bags ready, pipe the royal icing onto your cookies, creating whimsical winter forest designs. Be as detailed as you like—this is where your creativity can shine.
For the finishing touches, apply edible gold dust on the deer for a magical sparkle and sprinkle fine sugar or edible glitter to mimic a glistening snow effect. Use a small brush for final details!
Allow the royal icing to dry completely before serving or packaging your gingerbread cookies. This step ensures your beautiful designs hold their shape and look pristine.
Tips & Tricks
To elevate your Gingerbread Cookies with Winter Forest Design, consider adding a touch of freshly grated nutmeg or even a hint of orange zest to the dough for an extra flavor burst. Make sure your butter is sufficiently softened before starting to achieve the creamiest mixture for your cookies. Always measure your flour accurately, as too much can make the dough dry. Also, for a spicier cookie, feel free to increase the ground ginger or cinnamon slightly. Lastly, if you want to add more depth to the icing flavors, try using almond extract instead of vanilla in your royal icing.
Serving Suggestions & Pairings
These Gingerbread Cookies with Winter Forest Design are best enjoyed with a warm cup of spiced tea or hot cocoa. They make a lovely centerpiece for holiday gatherings, beautifully arranged on platters or gift boxes. For a fun experience, set up a cookie decorating party, inviting friends and family to join in the fun. Pair these cookies with seasonal fruits like clementines or pomegranates for a contrasting flavor combination that brightens the palate.
Nutritional Information
While it’s difficult to provide precise nutritional values without specific portion sizes, a typical gingerbread cookie contains around 90-100 calories. Gingerbread cookies can be a delightful indulgence, especially during the holiday season. With a perfect balance of sugar and spices, remember that moderation is key!
Storing Tips & Variations
To store your cookies, place them in an airtight container at room temperature. They can last several days without losing their delightful taste and texture. For longer storage, consider freezing the undecorated cookies. Simply wrap them tightly in plastic wrap and place them in a freezer-safe bag. When you’re ready to enjoy them, let them thaw and then decorate! For variations, try incorporating different spices or adding chopped nuts for toppings. You could also experiment with alternative flours, such as whole wheat or gluten-free mixes, to suit dietary needs.
Conclusion
We hope this step-by-step guide encourages you to try making Gingerbread Cookies with Winter Forest Design for yourself! They are not only a tasty treat, but also a project that can bring people together during the holiday season. You can relish the aromas wafting through your kitchen as you bake while creating joy through decor and sharing. Don’t forget to let us know how your cookies turned out and what creative designs you came up with!
FAQs
Can I make the dough ahead of time?
Absolutely! You can prepare the dough a day in advance and keep it wrapped in plastic wrap in the fridge.How do I know when the cookies are done baking?
The cookies are ready when the edges turn lightly golden, and the center will still be soft but not doughy.Can I use store-bought icing?
Yes, store-bought icing can save time, especially if you’re short on time. Just make sure it’s suitable for piping!How should I store decorated cookies?
Keep them in an airtight container at room temperature, and they should stay fresh for about a week.What variations can I try with the cookie shapes?
Feel free to use different cookie cutters such as stars, snowflakes, or festive characters to add variety to your cookie display!
Gingerbread Cookies with Winter Forest Design
Ingredients
Cookie Ingredients
- 3 1/4 cups all-purpose flour Perfect for creating a sturdy yet tender base.
- 3/4 teaspoon baking soda Helps the cookies rise perfectly.
- 1 tablespoon ground ginger Adds a warm, spicy kick.
- 1 tablespoon ground cinnamon Fills the kitchen with comforting scents.
- 1/4 teaspoon ground cloves Contributes to the aromatic profile.
- 1/4 teaspoon nutmeg Gives a warm hug flavor.
- 1/2 teaspoon salt Balances the sweet flavors.
- 1/2 cup unsalted butter Softened for rich flavor and silky texture.
- 1/2 cup packed brown sugar Provides moisture and a deep molasses flavor.
- 1 large egg Acts as a binding agent.
- 2/3 cup unsulfured molasses The star ingredient giving sweetness.
- 1 teaspoon pure vanilla extract Enhances all flavors harmoniously.
Royal Icing Ingredients
- 3 cups powdered sugar For sweetness and shine.
- 2 large egg whites Essential for royal icing.
- 3 tablespoons meringue powder Optional, mixed with 6 tablespoons water.
- 1/2 teaspoon vanilla or almond extract For flavoring the icing.
- as needed gel food coloring For decorating, use green, white, brown, and optional blue.
- as needed edible gold dust For a magical touch on designs.
- as needed fine sugar or edible glitter For a snow effect.
Instructions
Preparation
- In a medium bowl, whisk together the flour, baking soda, ground ginger, cinnamon, cloves, nutmeg, and salt.
- In a large bowl, cream the softened butter and brown sugar until light and fluffy.
- Add the egg, molasses, and vanilla extract, mixing until fully combined.
- Gradually add the dry ingredients to the wet mixture, stirring until a dough forms.
- If too sticky, add a bit more flour.
- Divide the dough into two portions, wrap in plastic wrap, and chill in the refrigerator for at least one hour.
Baking
- Preheat your oven to 350°F (175°C) and line baking sheets with parchment paper.
- On a floured surface, roll out one portion of your dough to about 1/4-inch thickness.
- Use cookie cutters to cut out your desired shapes.
- Place cutouts on lined baking sheets, leaving space between them.
- Bake in the oven for 8-10 minutes or until the edges are lightly golden.
- Allow the cookies to cool on the baking sheets for a few minutes before transferring them to a wire rack.
Royal Icing Preparation
- Beat the egg whites (or meringue mixture) until stiff peaks form.
- Gradually add in powdered sugar and vanilla extract, mixing until smooth.
- Divide icing into bowls and color with food coloring for your winter forest design.
Decorating
- Pipe the royal icing onto cookies, creating whimsical winter forest designs.
- For finishing touches, apply edible gold dust and sprinkle fine sugar to mimic a snow effect.
- Allow royal icing to dry completely before serving or packaging.